Getting Your Website Online: Web Hosting
At this point you should have a product or service you want to promote, you should have an idea of the type of website you want to create whether that’s a shopping cart or a sales page and you should have a domain name ready to go.
The next step is to acquire web hosting and setup shop!
 In my 10-years of working online I have gone through dozens of web hosting companies. I have worked with great companies to just down right horrible web hosting companies. Anyone with a server and an internet connection can setup shop and start selling web hosting packages.
You don’t want to trust your website to fly by night web hosting companies that won’t be there if your website goes down in the middle of the night, personally I use HostGator with all my critical websites.
A web host such as HostGator manages hundreds of thousands of servers in large data centers spread throughout the world. They have been around since 2002 and are considered the #1 rated shared web hosting provider available. I’m a big fan.
I personally recommend the smallest “Hatchling Plan” or the second smallest “Baby Plan” available. You can always upgrade at a later time. As a brand new website you don’t need an expensive Virtual Private Server or Dedicated Server starting out, a basic shared hosting plan is plenty for now.
Get 25% off Web Hosting
Note: To take advantage of the free shopping cart install, forward your HostGator login information with details about your shopping cart to [email protected] and I’ll install your shopping cart for you. Afterwards, I’ll email you back the login information for your new website and you can start setting up shop! More details can be found here.
After you purchase Web Hosting
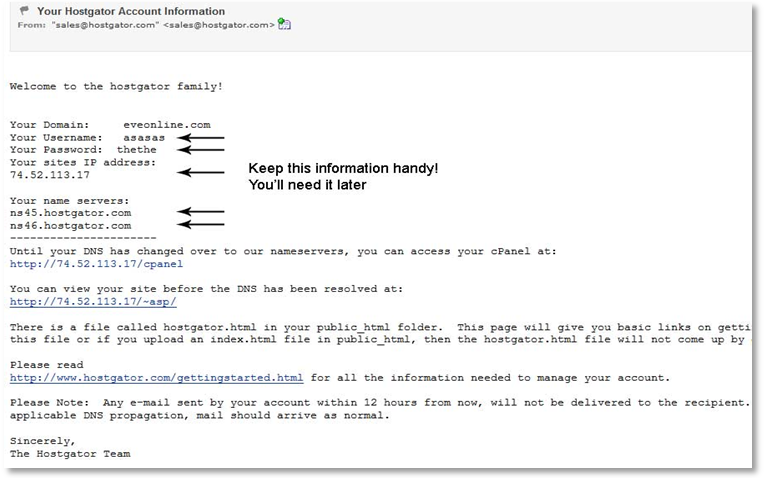
After you complete your order, you will receive an email detailing how to connect to your website–save these details for later. Please make note of your username, password, name severs and IP Address.
![]() Again if you require help after your purchase, I will install your shopping cart for you at no additional cost. It’s my way of saying thanks for your support. All you need to do is forward your login information to [email protected] and let me know more details about your shopping cart and I’ll be happy to install it for you.
Again if you require help after your purchase, I will install your shopping cart for you at no additional cost. It’s my way of saying thanks for your support. All you need to do is forward your login information to [email protected] and let me know more details about your shopping cart and I’ll be happy to install it for you.
Congrats you have Web Hosting!
Now we’ll connect your domain name to your web hosting account and start building your website.
Setting up Your Name Servers (easy stuff)
You should have your domain name and web hosting ready to go before moving foward.
HostGator should have sent you an email with the details needed to link your web host (HostGator) to your domain name registrar (NameCheap). Now we’re going to tell NameCheap that you want your domain name to point to your Web Host. Sounds like crazy talk? It’s easy, no worries.
With my first website this was hard to comprehend but really, all we’re doing is adding two lines of text HostGator sent us in the “Account Information” email, to NameCheap. This will link your web host to your domain name provider. If you have trouble with this, contact NameCheap and they will walk you through it.
- In the email titled ‘Your HostGator Account Information’ you should see your name servers listed. Look at the above screen shot for reference. Example: ns45.hostgator.com and ns46.hostgator.com. These are example name servers – do not use for your domain name!
- Once you have this information, login to your NameCheap account.
- Click to view your domain names.
- Select the domain name you just purchased.
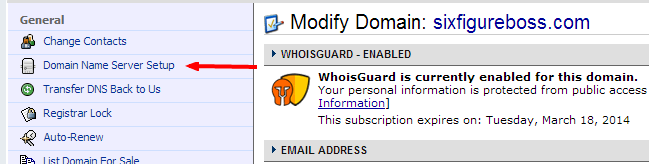
- Select ‘Domain Name Server Setup’.
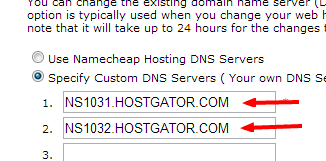
- Click on ‘Specify Custom DNS Servers’.
- Enter both Name Servers you received from HostGator to NameCheap.
- Click ‘Save Changes’
You’re done!
![]() It can take anywhere from 20 minutes to 48 hours for DNS information to update to your local ISP (Internet Service Provider). Your website may not show up for the first 48 hours. Proxy sites like HideMyAss.com are usually updated within a few minutes though. After your name servers are setup, go to HideMyAss.com and input your domain name to verify that everything is working correctly.
It can take anywhere from 20 minutes to 48 hours for DNS information to update to your local ISP (Internet Service Provider). Your website may not show up for the first 48 hours. Proxy sites like HideMyAss.com are usually updated within a few minutes though. After your name servers are setup, go to HideMyAss.com and input your domain name to verify that everything is working correctly.
You should see a HostGator welcome screen after you enter your domain name. At this point I typically wait a day or two to make sure my ISP reflects the changes made to my website before moving on.
If you’re having trouble with this, contact NameCheap support and they will help you out. They can even add name servers to your account for you. Just give them the information and they’ll take care of it.
Awesome! Now we’re set to move forward and start generating targeted traffic for your website!
I'm Donald, I have a passion for making money online and teaching others how to make money online. If you haven't read Six Figure Boss already, check it out. It's a complete step-by-step guide to to creating your own online business.
Leave a Reply
1 Comment on "Getting Your Website Online: Web Hosting"
[…] […]